Background Jobs
No one likes waiting in line. This is especially true of your website: users don't want to wait for things to load that don't directly impact the task they're trying to accomplish. For example, sending a "welcome" email when a new user signs up. The process of sending the email could take as long or longer than the sum total of everything else that happens during that request. Why make the user wait for it? As long as they eventually get the email, everything is good.
Concepts
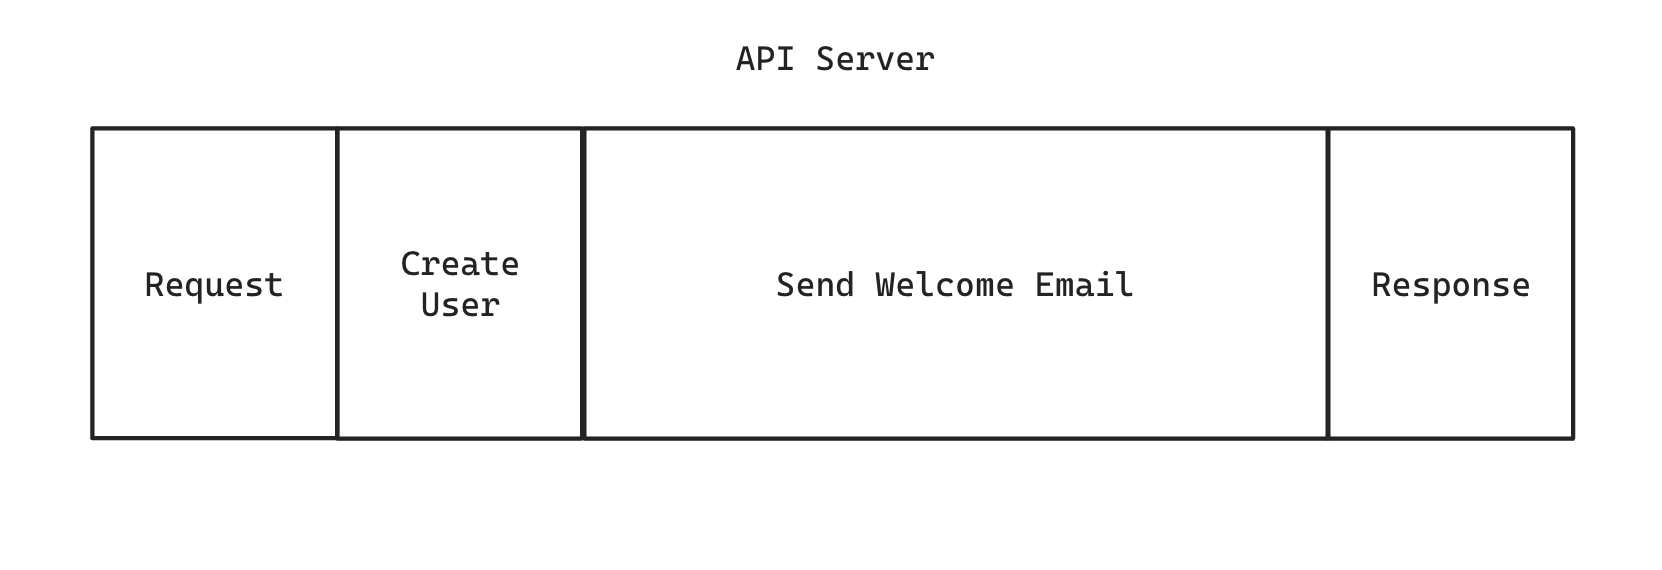
A typical create-user flow could look something like this:
If we want the email to be sent asynchronously, we can shuttle that process off into a background job:
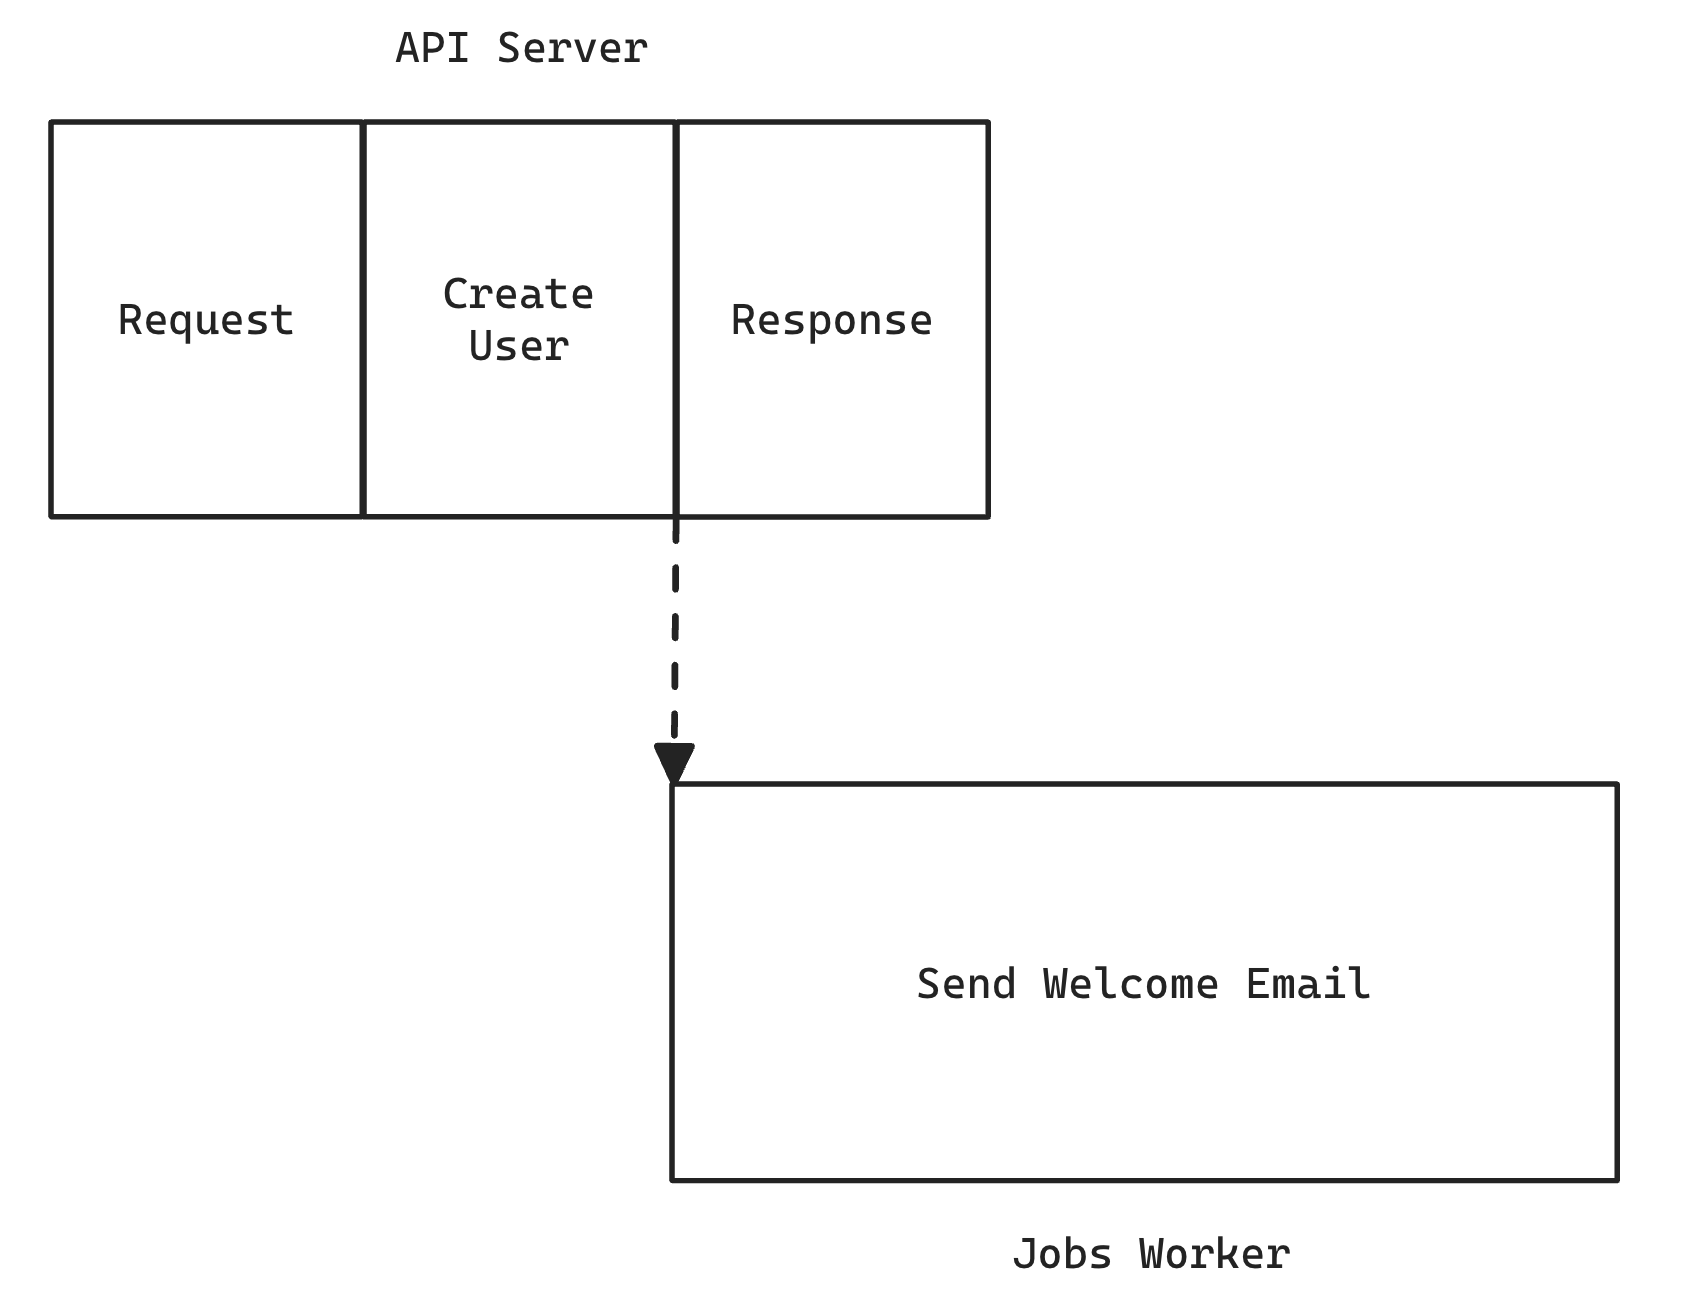
The user's response is returned much quicker, and the email is sent by another process, literally running in the background. All of the logic around sending the email is packaged up as a job and a job worker is responsible for executing it.
Each job is completely self-contained and has everything it needs to perform its own task.
Overview
There are three components to the Background Job system in Redwood:
- Scheduling
- Storage
- Execution
Scheduling is the main interface to background jobs from within your application code. This is where you tell the system to run a job at some point in the future, whether that's:
- as soon as possible
- delay for an amount of time before running
- run at a specific datetime in the future
Storage is necessary so that your jobs are decoupled from your running application. The job system interfaces with storage via an adapter. With the included PrismaAdapter, jobs are stored in your database. This allows you to scale everything independently: the api server (which is scheduling jobs), the database (which is storing the jobs ready to be run), and the job workers (which are executing the jobs).
Execution is handled by a job worker, which takes a job from storage, executes it, and then does something with the result, whether it was a success or failure.
When scheduling a job, you're really saying "this is the earliest possible time I want this job to run": based on what other jobs are in the queue, and how busy the workers are, they may not get a chance to execute this one particular job for an indeterminate amount of time.
The only thing that's guaranteed is that a job won't run any earlier than the time you specify.
Queues
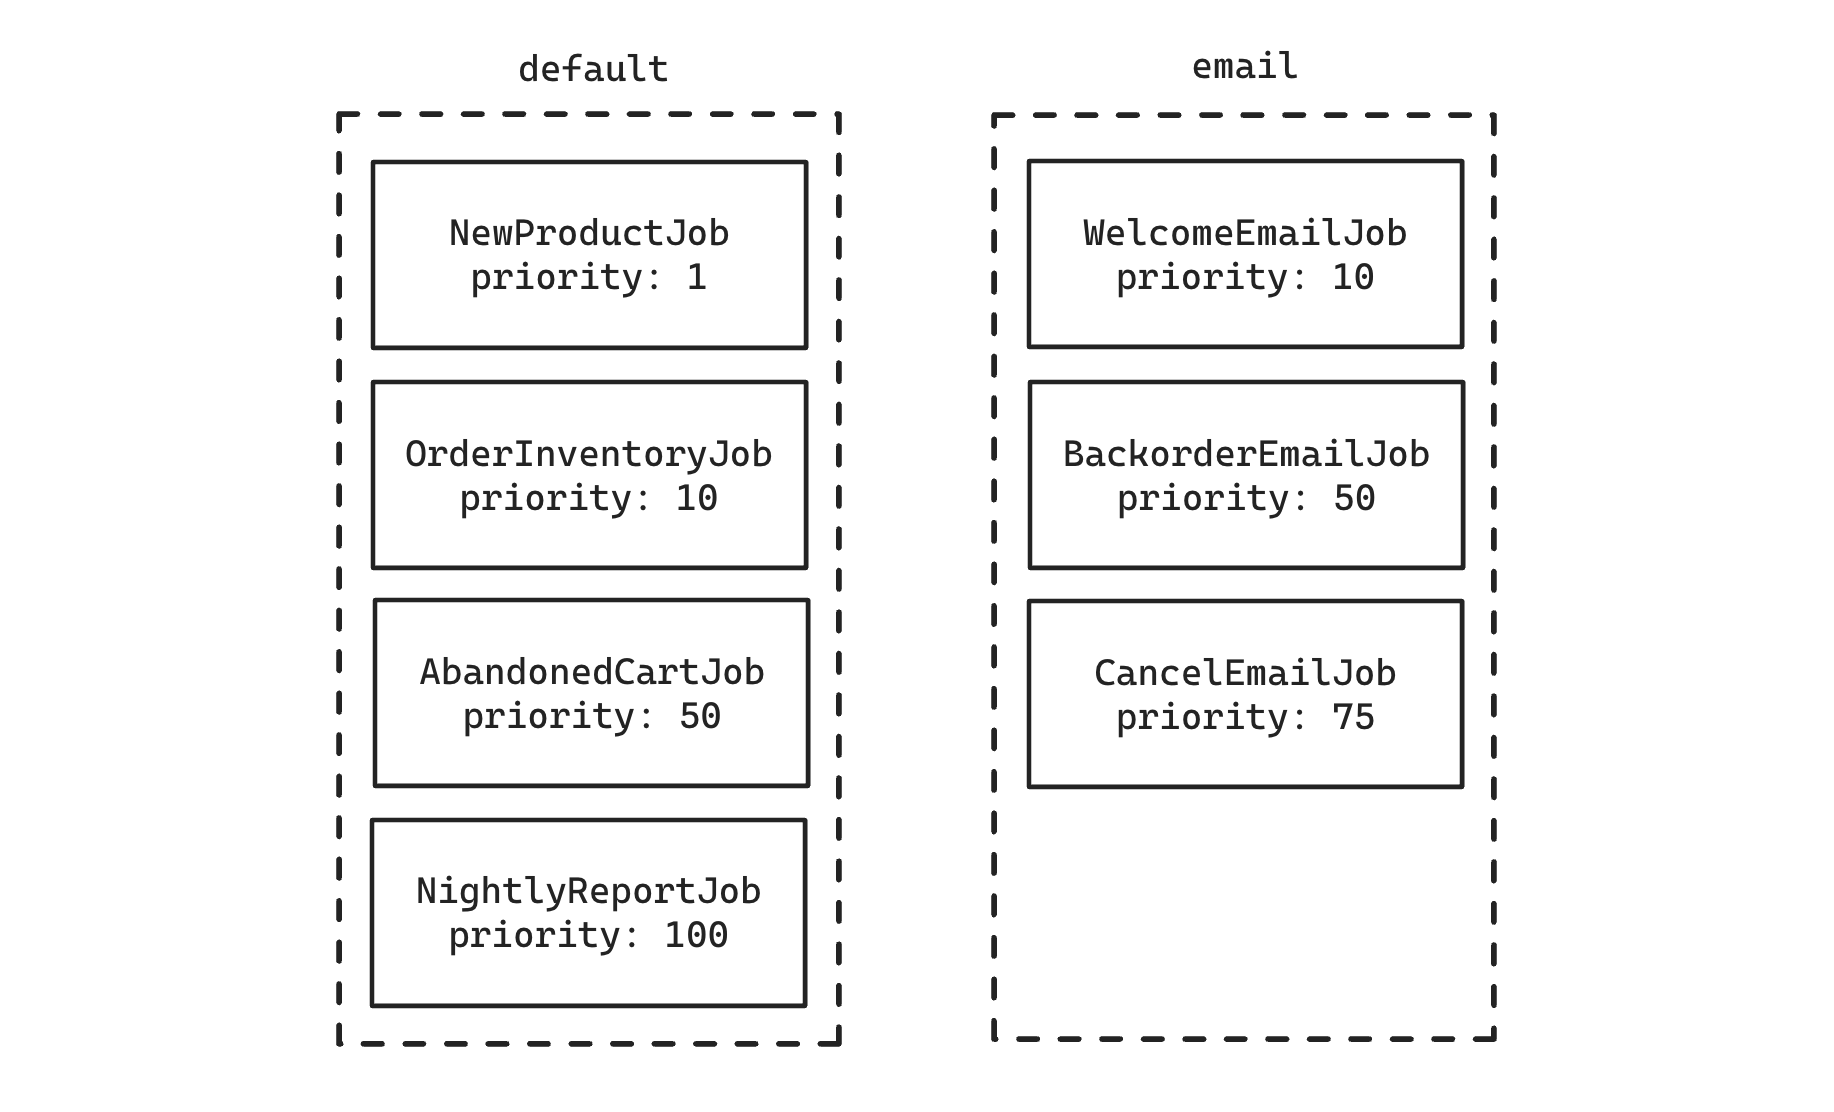
Jobs are organized by a named queue. This is simply a string and has no special significance, other than letting you group jobs. Why group them? So that you can potentially have workers with different configurations working on them. Let's say you send a lot of emails, and you find that among all your other jobs, emails are starting to be noticeably delayed when sending. You can start assigning those jobs to the "email" queue and create a new worker group that only focuses on jobs in that queue so that they're sent in a more timely manner.
Jobs are sorted by priority before being selected to be worked on. Lower numbers mean higher priority:
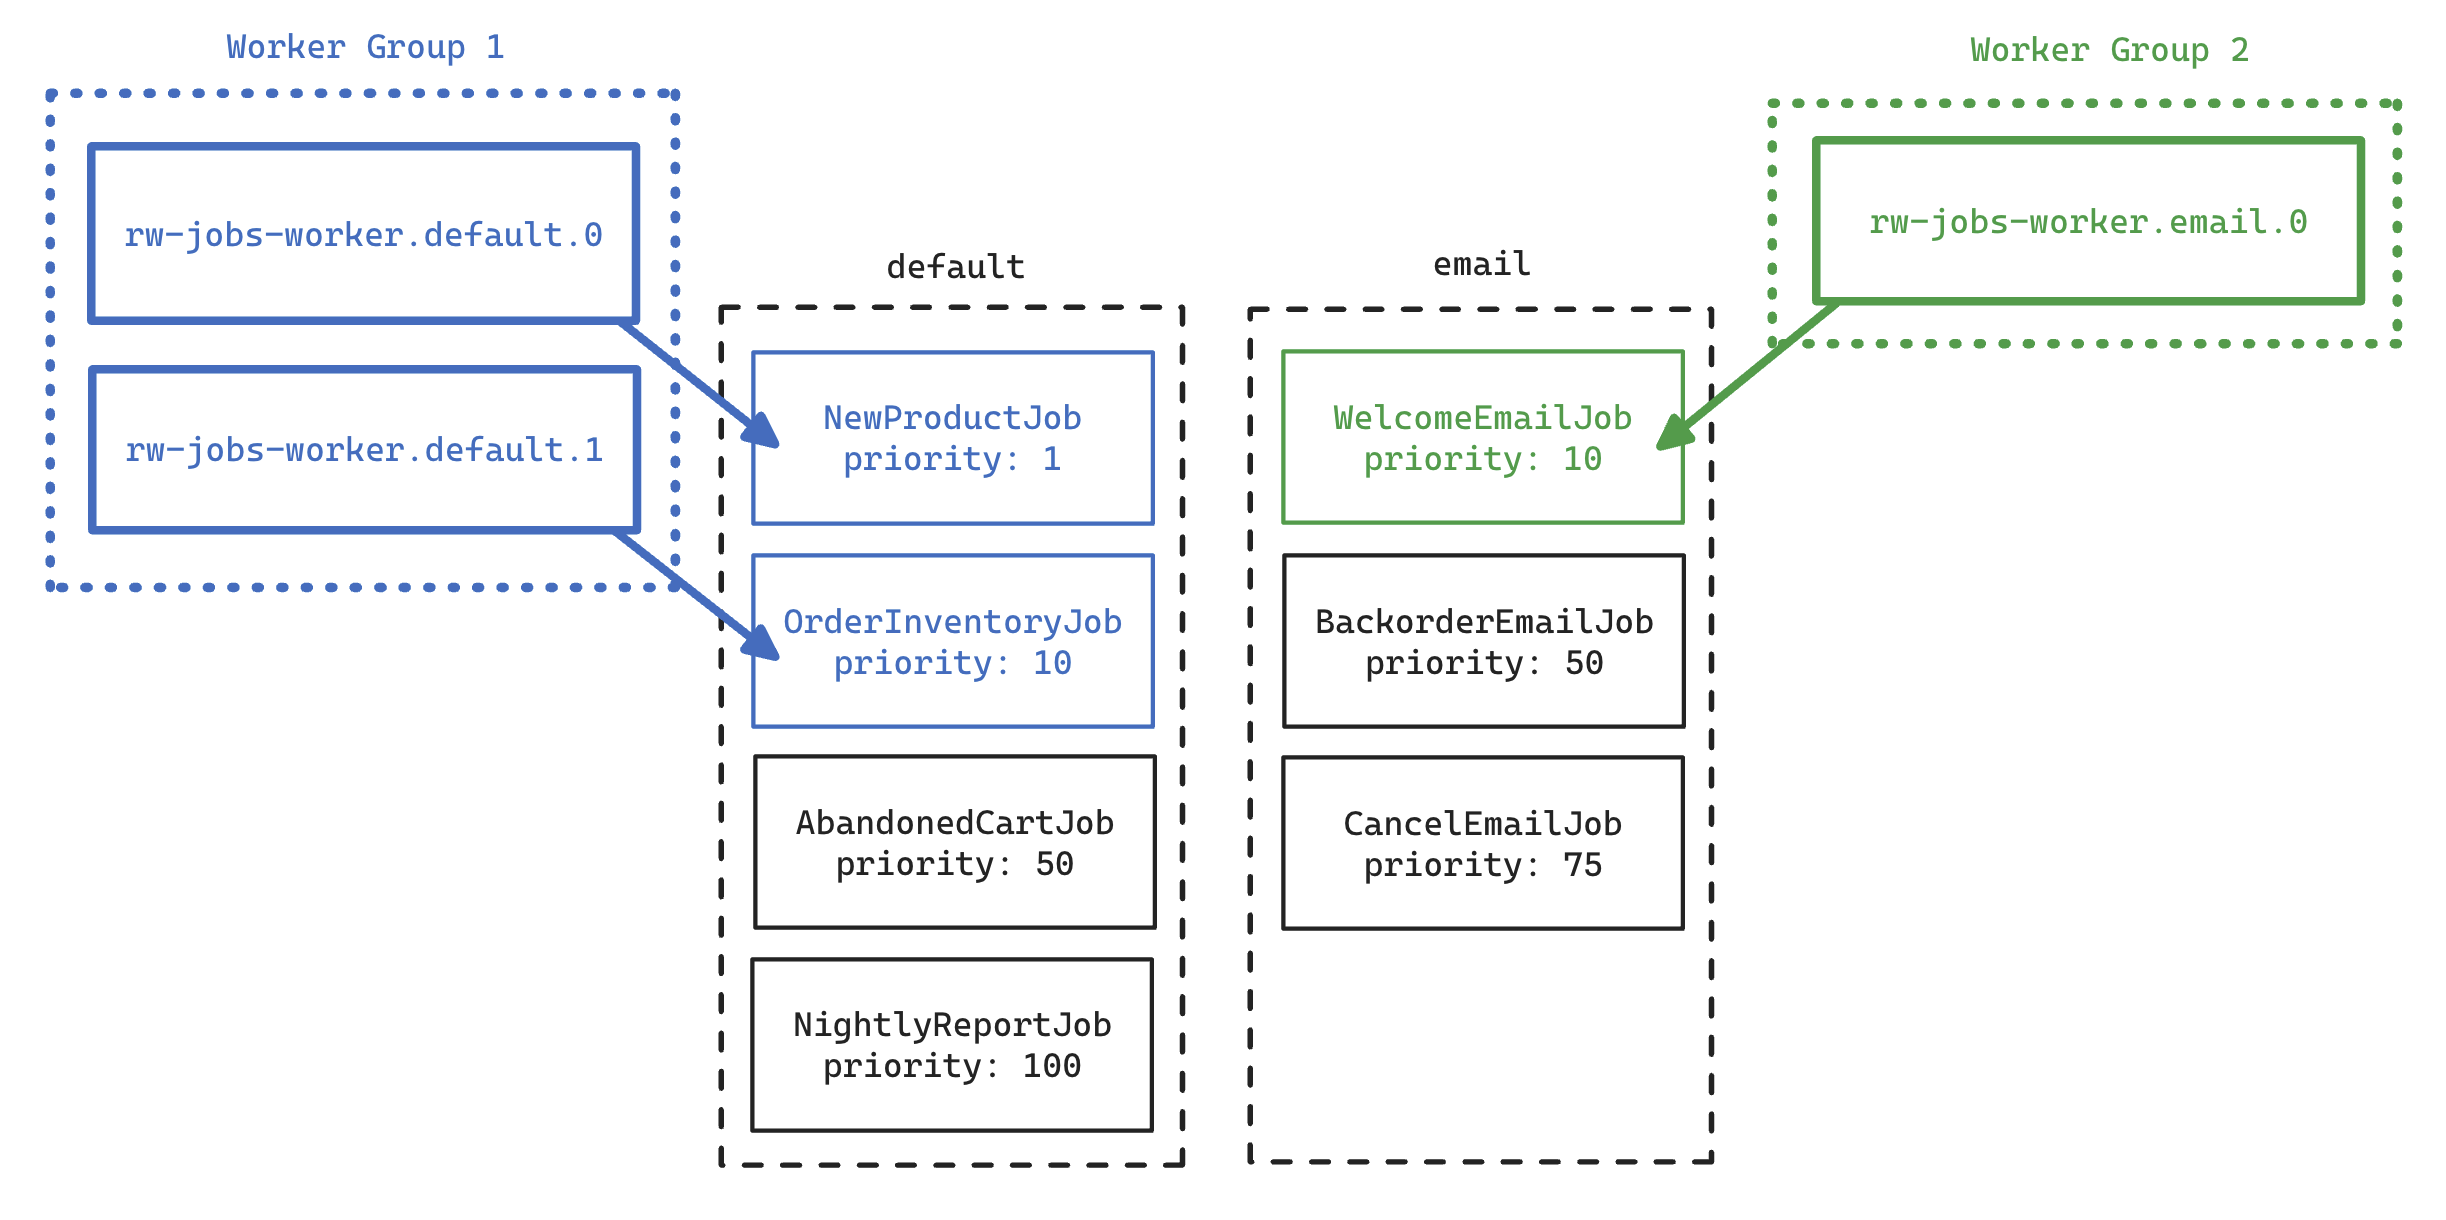
You can also increase the number of workers in a group. If we bumped the group working on the "default" queue to 2 and started our new "email" group with 1 worker, once those workers started we would see them working on the following jobs:
Quick Start
Start here if you want to get up and running with jobs as quickly as possible and worry about the details later.
Setup
Run the setup command to get the jobs configuration file created and migrate the database with a new BackgroundJob table:
yarn rw setup jobs
yarn rw prisma migrate dev
This created api/src/lib/jobs.js (or .ts) with a sensible default config. You can leave this as is for now.
Create a Job
yarn rw g job SampleJob
This created api/src/jobs/SampleJob/SampleJob.js and a test and scenario file. For now the job just outputs a message to the logs, but you'll fill out the perform() function to take any arguments you want and perform any work you want to do. Let's update the job to take a user's id and then just print that to the logs:
import { jobs } from 'src/lib/jobs'

export const SampleJob = jobs.createJob({
  queue: 'default',
  perform: async (userId) => {
    jobs.logger.info(`Received user id ${userId}`)
  },
})
Schedule a Job
You'll most likely be scheduling work as the result of one of your service functions being executed. Let's say we want to schedule our SampleJob whenever a new user is created:
import { db } from 'src/lib/db'
import { later } from 'src/lib/jobs'
import { SampleJob } from 'src/jobs/SampleJob'

export const createUser = async ({ input }) => {
  const user = await db.user.create({ data: input })
  await later(SampleJob, [user.id], { wait: 60 })
  return user
}
The first argument is the job itself, the second argument is an array of all the arguments your job should receive. The job itself defines them as normal, named arguments (like userId), but when you schedule you wrap them in an array (like [user.id]). The third argument is an optional object that provides a couple of options. In this case, the number of seconds to wait before this job will be run (60 seconds).
Executing a Job
Start the worker process to find jobs in the DB and execute them:
yarn rw jobs work
This process will stay attached to the terminal and show you debug log output as it looks for jobs to run. Note that since we scheduled our job to wait 60 seconds before running, the runner will not find a job to work on right away (unless it's already been a minute since you scheduled it!).
That's the basics of jobs! Keep reading to get a more detailed walkthrough, followed by the API docs listing all the various options. We'll wrap up with a discussion of using jobs in a production environment.
In-Depth Start
Let's go into more depth in each of the parts of the job system.
Installation
To get started with jobs, run the setup command:
yarn rw setup jobs
This will add a new model to your Prisma schema, and create a configuration file at api/src/lib/jobs.js (or .ts for a TypeScript project). You'll need to run migrations in order to actually create the model in your database:
yarn rw prisma migrate dev
This added the following model:
model BackgroundJob {
  id        Int       @id @default(autoincrement())
  attempts  Int       @default(0)
  handler   String
  queue     String
  priority  Int
  runAt     DateTime?
  lockedAt  DateTime?
  lockedBy  String?
  lastError String?
  failedAt  DateTime?
  createdAt DateTime  @default(now())
  updatedAt DateTime  @updatedAt
}
Let's look at the config file that was generated. Comments have been removed for brevity:
import { PrismaAdapter, JobManager } from '@redwoodjs/jobs'

import { db } from 'src/lib/db'
import { logger } from 'src/lib/logger'

export const jobs = new JobManager({
  adapters: {
    prisma: new PrismaAdapter({ db, logger }),
  },
  queues: ['default'],
  logger,
  workers: [
    {
      adapter: 'prisma',
      logger,
      queue: '*',
      count: 1,
      maxAttempts: 24,
      maxRuntime: 14_400,
      deleteFailedJobs: false,
      sleepDelay: 5,
    },
  ],
})

export const later = jobs.createScheduler({
  adapter: 'prisma',
})
Two variables are exported: one is an instance of the JobManager called jobs on which you'll call functions to create jobs and schedulers. The other is later which is an instance of the Scheduler, which is responsible for getting your job into the storage system (out of the box this will be the database thanks to the PrismaAdapter).
We'll go into more detail on this file later (see JobManager Config), but what's there now is fine to get started creating a job.
Creating New Jobs
We have a generator that creates a job in api/src/jobs:
yarn rw g job SendWelcomeEmail
Jobs are defined as a plain object and given to the createJob() function (which is called on the jobs export in the config file above). An example SendWelcomeEmailJob may look something like:
import { db } from 'src/lib/db'
import { mailer } from 'src/lib/mailer'
import { jobs } from 'src/lib/jobs'

export const SendWelcomeEmailJob = jobs.createJob({
  queue: 'default',
  perform: async (userId) => {
    const user = await db.user.findUnique({ where: { id: userId } })
    await mailer.send(WelcomeEmail({ user }), {
      to: user.email,
      subject: `Welcome to the site!`,
    })
  },
})
At a minimum, a job must contain the name of the queue the job should be saved to, and a function named perform() which contains the logic for your job. You can add additional properties to the object to support the task your job is performing, but perform() is what's invoked by the job worker that we'll see later.
Note that perform() can take any argument(s) you want (or none at all), but it's a best practice to keep them as simple as possible. With the PrismaAdapter the arguments are stored in the database, so the list of arguments must be serializable to and from a string of JSON.
Most jobs will probably act against data in your database, so it makes sense to have the arguments simply be the id of those database records. When the job executes it will look up the full database record and then proceed from there.
If it's likely that the data in the database will change before your job is actually run, but you need the job to run with the original data, you may want to include the original values as arguments to your job. This way the job is sure to be working with those original values and not the potentially changed ones in the database.
Scheduling Jobs
Remember the later export in the jobs config file:
export const later = jobs.createScheduler({
  adapter: 'prisma',
})
You call this function, passing the job, job arguments, and an optional options object when you want to schedule a job. Let's see how we'd schedule our welcome email to go out when a new user is created:
import { later } from 'src/lib/jobs'
import { SendWelcomeEmailJob } from 'src/jobs/SendWelcomeEmailJob'

export const createUser = async ({ input }) {
  const user = await db.user.create({ data: input })
  await later(SendWelcomeEmailJob, [user.id])
  return user
}
By default the job will run as soon as possible. If you wanted to wait five minutes before sending the email you can set a wait time to a number of seconds:
later(SendWelcomeEmailJob, [user.id], { wait: 300 })
Or run it at a specific datetime:
later(MillenniumAnnouncementJob, [user.id], {
  waitUntil: new Date(3000, 0, 1, 0, 0, 0),
})
If we were to query the BackgroundJob table after the job has been scheduled you'd see a new row. We can use the Redwood Console to query the table from the command line:
% yarn rw console
> db.backgroundJob.findMany()
[
  {
    id: 1,
    attempts: 0,
    handler: '{"name":"SendWelcomeEmailJob",path:"SendWelcomeEmailJob/SendWelcomeEmailJob","args":[335]}',
    queue: 'default',
    priority: 50,
    runAt: 2024-07-12T22:27:51.085Z,
    lockedAt: null,
    lockedBy: null,
    lastError: null,
    failedAt: null,
    createdAt: 2024-07-12T22:27:51.125Z,
    updatedAt: 2024-07-12T22:27:51.125Z
  }
]
Because we're using the PrismaAdapter here all jobs are stored in the database, but if you were using a different storage mechanism via a different adapter you would have to query those in a manner specific to that adapter's backend.
The handler column contains the name of the job, file path to find it, and the arguments its perform() function will receive. Where did the name and path come from? We have a babel plugin that adds them to your job when they are built!
Jobs are run from the api/dist directory, which will exist only after running yarn rw build api or yarn rw dev. If you are working on a job in development, you're probably running yarn rw dev anyway. But just be aware that if the dev server is not running then any changes to your job will not be reflected unless you run yarn rw build api (or start the dev server) to compile your job into api/dist.
Executing Jobs
In development you can start a job worker via the job runner from the command line:
yarn rw jobs work
The runner is a sort of overseer that doesn't do any work itself, but spawns workers to actually execute the jobs. When starting in work mode your workers config will be used to start the workers and they will stay attached to the terminal, updating you on the status of what they're doing:
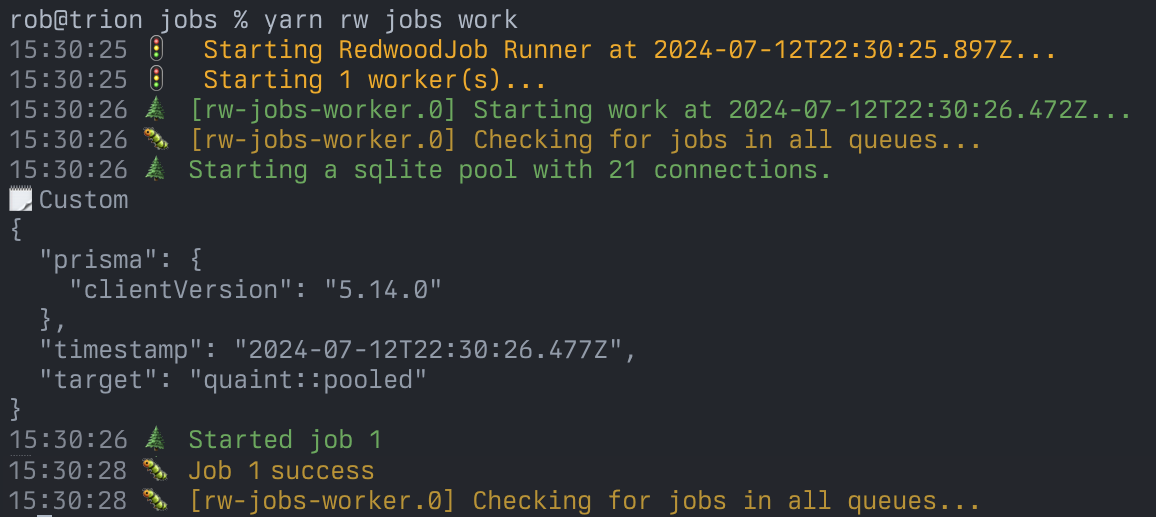
It checks the BackgroundJob table every few seconds for a new job and, if it finds one, locks it so that no other workers can have it, then calls your perform() function, passing it the arguments you gave when you scheduled it.
If the job succeeds then by default it's removed from the database (using the PrismaAdapter, other adapters behavior may vary). If the job fails, the job is un-locked in the database, the runAt is set to an incremental backoff time in the future, and lastError is updated with the error that occurred. The job will now be picked up in the future once the runAt time has passed and it'll try again.
To stop the runner (and the workers it started), press Ctrl-C (or send SIGINT). The workers will gracefully shut down, waiting for their work to complete before exiting. If you don't wait to wait, hit Ctrl-C again (or send SIGTERM).
There are a couple of additional modes that rw jobs can run in:
yarn rw jobs workoff
This mode will execute all jobs that are eligible to run, then stop itself.
yarn rw jobs start
Starts the workers and then detaches them to run forever. Use yarn rw jobs stop to stop them, or yarn rw jobs restart to pick up any code changes to your jobs.
Everything Else
The rest of this doc describes more advanced usage, like:
- Assigning jobs to named queues
- Setting a priority so that some jobs always run before others
- Using different adapters and loggers on a per-job basis
- Starting more than one worker
- Having some workers focus on only certain queues
- Configuring individual workers to use different adapters
- Manually start workers without the job runner monitoring them
- And more!
Instantly Running Jobs
As noted in the Concepts section, a job is never guaranteed to run at an exact time. The worker could be busy working on other jobs and can't get to yours just yet.
If you absolutely, positively need your job to run right now (with the knowledge that the user will be waiting for it to complete) you can call your job's perform function directly in your code:
await SampleEmailJob.perform(user.id)
Recurring Jobs
A common task for a background job is that it does something on a schedule: run reports every night at midnight, check for abandoned carts every 15 minutes, that sort of thing. We call these recurring jobs.
Redwood's job system will soon have native syntax for setting a job to run repeatedly, but in the meantime you can accomplish this by simply having your job schedule another copy of itself at some interval in the future:
import { later, jobs } from 'src/lib/jobs'

export const NightlyReportJob = jobs.createJob({
  queue: 'default',
  perform: async () => {
    await DailyUsageReport.run()
    await later(NightlyReportJob, [], {
      wait: new Date(new Date().getTime() + 86_400 * 1000),
    })
  },
})
Configuration
There are a bunch of ways to customize your jobs and the workers.
JobManager Config
Let's take a closer look at the jobs export in api/src/lib/jobs.js:
export const jobs = new JobManager({
  adapters: {
    prisma: new PrismaAdapter({ db, logger }),
  },
  queues: ['default'],
  logger,
  workers: [
    {
      adapter: 'prisma',
      logger,
      queue: '*',
      count: 1,
      maxAttempts: 24,
      maxRuntime: 14_400,
      deleteFailedJobs: false,
      sleepDelay: 5,
    },
  ],
})
The object passed here contains all of the configuration for the Background Job system. Let's take a quick look at the four top-level properties and then we'll get into more details in the subsections to follow.
adapters
This is the list of adapters that are available to handle storing and retrieving your jobs to and from the storage system. You could list more than one adapter here and then have multiple schedulers. Most folks will probably stick with a single one.
queues
An array of available queue names that jobs can be placed in. By default, a single queue named "default" is listed here, and will also be the default queue for generated jobs. To denote the named queue that a worker will look at, there is a matching queue property on the workers config below.
logger
The logger object for all internal logging of the job system itself and will fall back to console if you don't set it.
workers
This is an array of objects, each defining a "group" of workers. When will you need more than one group? If you need workers to work on different queues, or use different adapters. Read more about this in the Job Workers section.
Adapter Config
Adapters are added as key/value pairs to the adapters object given to the JobManager upon initialization. The key of the property (like prisma in the example below) is the name you'll use in your scheduler when you tell it which adapter to use to schedule your jobs. Adapters accept an object of options when they are initialized.
PrismaAdapter
export const jobs = new JobManager({
  adapters: {
    prisma: new PrismaAdapter({ db, model: 'BackgroundJob', logger }),
  },
  // remaining config...
})
db: [required] an instance ofPrismaClientthat the adapter will use to store, find and update the status of jobs. In most cases this will be thedbvariable exported fromapi/src/lib/db.ts. This must be set in order for the adapter to be initialized!model: the name of the model that was created to store jobs. This defaults toBackgroundJob.logger: events that occur within the adapter will be logged using this. This defaults toconsolebut theloggerexported fromapi/src/lib/loggerworks great.
Scheduler Config
When you create an instance of the scheduler you can pass it a couple of options:
export const later = jobs.createScheduler({
  adapter: 'prisma',
})
adapter: [required] the name of the adapter this scheduler will use to schedule jobs. Must be one of the keys that you gave to theadaptersoption on the JobManager itself.logger: the logger to use for this instance of the scheduler. If not provided, defaults to theloggerset on theJobManager.
Scheduling Options
When using the scheduler to schedule a job you can pass options in an optional third argument:
later(SampleJob, [user.id], { wait: 300 })
wait: number of seconds to wait before the job will runwaitUntil: a specificDatein the future to run at
If you don't pass any options then the job will be defaulted to run as soon as possible, ie: new Date()
Job Config
There are two configuration options you can define in the object that describes your job:
import { jobs } from 'src/lib/jobs'

export const SendWelcomeEmailJob = jobs.createJob({
  queue: 'email',
  priority: 1,
  perform: async (userId) => {
    // job details...
  },
})
queue: [required] the name of the queue that this job will be placed in. Must be one of the strings you assigned to thequeuesarray when you set up theJobManager.priority: within a queue you can have jobs that are more or less important. The workers will pull jobs off the queue with a higher priority before working on ones with a lower priority. A lower number is higher in priority than a higher number. Ie. the workers will work on a job with a priority of1before they work on one with a priority of100. If you don't override it here, the default priority is50.
Worker Config
This is the largest section of the JobManager config object. This options array tell the workers how to behave when looking for and executing jobs.
export const jobs = new JobManager({
  // .. more config
  workers: [
    {
      adapter: 'prisma',
      logger,
      queue: '*',
      count: 1,
      maxAttempts: 24,
      maxRuntime: 14_400,
      deleteFailedJobs: true,
      deleteSuccessfulJobs: false,
      sleepDelay: 5,
    },
  ],
This is an array of objects. Each object represents the config for a single "group" of workers. By default, there is only one worker group. It uses the PrismaAdapter and will look for jobs in all queues. If you want to start fine tuning your workers by working with different adapters, or only working on some named queues, you can add additional members to this array, each with a unique set of options.
adapter: [required] the name of the adapter this worker group will use. Must be one of the keys that you gave to theadaptersoption on theJobManageritself.logger: the logger to use when working on jobs. If not provided, defaults to theloggerset on theJobManager. You can use this logger in theperform()function of your job by accessingjobs.logger- queue : [required] the named queue(s) in which this worker group will watch for jobs. There is a reserved
'*'value you can use which means "all queues." This can be an array of queues as well:['default', 'email']for example. count: [required] the number of workers to start with this config.maxAttempts: the maximum number of times to retry a job before giving up. A job that throws an error will be set to retry in the future with an exponential backoff in time equal to the number of previous attempts ** 4. After this number, a job is considered "failed" and will not be re-attempted. Default:24.maxRuntime: the maximum amount of time, in seconds, to try running a job before another worker will pick it up and try again. It's up to you to make sure your job doesn't run for longer than this amount of time! Default:14_400(4 hours).deleteFailedJobs: when a job has failed (maximum number of retries has occurred) you can keep the job in the database, or delete it. Default:false.deleteSuccessfulJobs: when a job has succeeded, you can keep the job in the database, or delete it. It's generally assumed that your jobs will succeed so it usually makes sense to clear them out and keep the queue lean. Default:true.sleepDelay: the amount of time, in seconds, to wait before checkng the queue for another job to run. Too low and you'll be thrashing your storage system looking for jobs, too high and you start to have a long delay before any job is run. Default:5.
See the next section for advanced usage examples, like multiple worker groups.
Job Workers
A job worker actually executes your jobs. The workers will ask the adapter to find a job to work on. The adapter will mark the job as locked (the process name and a timestamp is set on the job) and then the worker will call perform() on your job, passing in any args that were given when you scheduled it. The behavior of what happens when the job succeeds or fails depends on the config options you set in the JobManager. By default, successful jobs are removed from storage and failed jobs and kept around so you can diagnose what happened.
The runner has several modes it can start in depending on how you want it to behave.
Dev Modes
These modes are ideal when you're creating a job and want to be sure it runs correctly while developing. You could also use this in production if you wanted (maybe a job is failing and you want to watch verbose logs and see what's happening).
yarn rw jobs work
This process will stay attached to the console and continually look for new jobs and execute them as they are found. The log level is set to debug by default so you'll see everything. Pressing Ctrl-C to cancel the process (sending SIGINT) will start a graceful shutdown: the workers will complete any work they're in the middle of before exiting. To cancel immediately, hit Ctrl-C again (or send SIGTERM) and they'll stop in the middle of what they're doing. Note that this could leave locked jobs in the database, but they will be picked back up again if a new worker starts with the same name as the one that locked the process. They'll also be picked up automatically after maxRuntime has expired, even if they are still locked.
It's currently up to you to make sure your job completes before your maxRuntime limit is reached! NodeJS Promises are not truly cancelable: you can reject early, but any Promises that were started inside will continue running unless they are also early rejected, recursively forever.
The only way to guarantee a job will completely stop no matter what is for your job to spawn an actual OS level process with a timeout that kills it after a certain amount of time. We may add this functionality natively to Jobs in the near future: let us know if you'd benefit from this being built in!
To work on whatever outstanding jobs there are and then automatically exit use the workoff mode:
yarn rw jobs workoff
As soon as there are no more jobs to be executed (either the store is empty, or they are scheduled in the future) the process will automatically exit.
Clearing the Job Queue
You can remove all jobs from storage with:
yarn rw jobs clear
Production Modes
In production you'll want your job workers running forever in the background. For that, use the start mode:
yarn rw jobs start
That will start a number of workers determined by the workers config on the JobManager and then detach them from the console. If you care about the output of that worker then you'll want to have configured a logger that writes to the filesystem or sends to a third party log aggregator.
To stop the workers:
yarn rw jobs stop
Or to restart any that are already running:
yarn rw jobs restart
Multiple Workers
With the default configuration options generated with the yarn rw setup jobs command you'll have one worker group. If you simply want more workers that use the same adapter and queue settings, increase the count:
export const jobs = new JobManager({
  adapters: {
    prisma: new PrismaAdapter({ db, logger }),
  },
  queues: ['default'],
  logger,
  workers: [
    {
      adapter: 'prisma',
      logger,
      queue: '*',
      count: 5,
      maxAttempts: 24,
      maxRuntime: 14_400,
      deleteFailedJobs: false,
      sleepDelay: 5,
    },
  ],
})
Now you have 5 workers. If you want to have separate workers working on separate queues, create another worker config object with a different queue name:
export const jobs = new JobManager({
  adapters: {
    prisma: new PrismaAdapter({ db, logger }),
  },
  queues: ['default'],
  logger,
  workers: [
    {
      adapter: 'prisma',
      logger,
      queue: 'default',
      count: 1,
      maxAttempts: 24,
      maxRuntime: 14_400,
      deleteFailedJobs: false,
      sleepDelay: 5,
    },
    {
      adapter: 'prisma',
      logger,
      queue: 'email',
      count: 1,
      maxAttempts: 1,
      maxRuntime: 30,
      deleteFailedJobs: true,
      sleepDelay: 5,
    },
  ],
})
Here, we have 2 workers working on the "default" queue and 1 worker looking at the "email" queue (which will only try a job once, wait 30 seconds for it to finish, and delete the job if it fails). You can also have different worker groups using different adapters. For example, you may store and work on some jobs in your database using the PrismaAdapter and some jobs/workers using a RedisAdapter.
We don't currently provide a RedisAdapter but plan to add one soon! You'll want to create additional schedulers to use any other adapters as well:
export const prismaLater = jobs.createScheduler({
  adapter: 'prisma',
})

export const redisLater = jobs.createScheduler({
  adapter: 'redis',
})
Job Errors & Failure
Jobs sometimes don't complete as expected, either because of an error in our code (unlikely, of course) or because a third party service that's being accessed responds in an unexpected way. Luckily, the job system is ready to handle these problems gracefully.
If you're using the PrismaAdapter and an uncaught error occurs while the worker is executing your perform function, three things happen:
- The job's
runAttime is set to a new time in the future, based on an incremental backoff computed from the number of previous attempts at running the job (by default it'sattempts ** 4) - The error message and backtrace is recorded in the
lastErrorfield - The job is unlocked so that it's available for another worker to pick up when the time comes
By checking the lastError field in the database you can see what the last error was and attempt to correct it, if possible. If the retry occurs and another error is thrown, the same sequence above will happen unless the number of attempts is equal to the maxAttempts config variable set in the jobs config. If maxAttempts is reached then the job is considered failed and will not be rescheduled. runAt is set to NULL, the failedAt timestamp is set to now and, assuming you have deleteFailedJobs set to false, the job will remain in the database so you can inspect it and potentially correct the problem.
Deployment
For many use cases you may be able to rely on the job runner to start and detach your job workers, which will then run forever:
yarn rw jobs start
When you deploy new code you'll want to restart your runners to make sure they get the latest source files:
yarn rw jobs restart
Using this utility, however, gives you nothing to monitor that your jobs workers are still running: the runner starts the required number of workers, detaches them, and then exits itself. Node processes are pretty robust, but by no means are they guaranteed to run forever with no problems. You could mistakenly release a bad job that has an infinite loop or even just a random gamma ray striking the RAM of the server could cause a panic and the process will be shut down.
For maximum reliability you should take a look at the Advanced Job Workers section and manually start your workers this way, with a process monitor like pm2 or nodemon to watch and restart the workers if something unexpected happens.
Of course if you have a process monitor system watching your workers you'll want to use the process monitor's version of the restart command each time you deploy!
NODE_ENV
You'll need to explicitly set your NODE_ENV when in environments other than development or test. We like having a .env file in a serverfull production environment, and you just include:
NODE_ENV=production
If you're using Docker, make sure you have an ENV declaration for it:
ENV NODE_ENV="production"
Advanced Job Workers
As noted above, although the workers are started and detached using the yarn rw jobs start command, there is nothing to monitor those workers to make sure they keep running. To do that, you'll want to start the workers yourself (or have your process monitor start them) using command line flags.
You can do this with the yarn rw-jobs-worker command. The flags passed to the script tell it which worker group config to use to start itself, and which id to give this worker (if you're running more than one). To start a single worker, using the first workers config object, you would run:
yarn rw-jobs-worker --index=0 --id=0
The job runner started with yarn rw jobs start runs this same command behind the scenes for you, keeping it attached or detached depending on if you start in work or start mode!
Flags
--index: a number that represents the index of theworkersconfig array you passed to theJobManager. Setting this to0, for example, uses the first object in the array to set all config options for the worker.--id: a number identifier that's set as part of the process name. Starting a worker with--id=0and then inspecting your process list will show one worker running namedrw-job-worker.queue-name.0. Usingyarn rw-jobs-workeronly ever starts a single instance, so if your config had acountof2you'd need to run the command twice, once with--id=0and a second time with--id=1.--workoff: a boolean that will execute all currently available jobs and then cause the worker to exit. Defaults tofalse--clear: a boolean that starts a worker to remove all jobs from all queues. Defaults tofalse
Your process monitor can now restart the workers automatically if they crash since the monitor is using the worker script itself and not the wrapping job runner.
What Happens if a Worker Crashes?
If a worker crashes because of circumstances outside of your control the job will remained locked in the storage system: the worker couldn't finish work and clean up after itself. When this happens, the job will be picked up again immediately if a new worker starts with the same process title, otherwise when maxRuntime has passed it's eligible for any worker to pick up and re-lock.
Creating Your Own Adapter
We'd love the community to contribute adapters for Redwood Jobs! Take a look at the source for BaseAdapter for what's absolutely required, and then the source for PrismaAdapter to see a concrete implementation.
The general gist of the required functions:
find()should find a job to be run, lock it and return it (minimum return of an object containingid,name,path,argsandattemptsproperties)schedule()acceptsname,path,args,runAt,queueandpriorityand should store the jobsuccess()accepts the same job object returned fromfind()and adeleteJobboolean for whether the job should be deleted upon success.error()accepts the same job object returned fromfind()and an error instance. Does whatever failure means to you (like unlock the job and reschedule a time for it to run again in the future)failure()is called when the job has reachedmaxAttempts. Accepts the job object and adeleteJobboolean that says whether the job should be deleted.clear()remove all jobs from the queue (mostly used in development).
The Future
There's still more to add to background jobs! Our current TODO list:
- More adapters: Redis, SQS, RabbitMQ...
- RW Studio integration: monitor the state of your outstanding jobs
- Baremetal integration: if jobs are enabled, monitor the workers with pm2
- Recurring jobs (like cron jobs)
- Lifecycle hooks:
beforePerform(),afterPerform(),afterSuccess(),afterFailure()